


Notching with the KAPEX for routing cables behind skirting boards/cornices
Description
In interior fitting work, frame legs, roof battens, skirting boards and similar elements often need to be notched or grooved in order to bridge electrical cables or heating pipes, for instance. This application example explains how to notch or groove a base board using the KAPEX KS 120 compound mitre saw.
Material list:
- 6 cm wide test piece of wood
Preparation/set-up
-
Initial steps
Before notching the skirting or square timber, the following steps must be followed:

-
Mark the area to be notched
Hold the skirting against the wall and place the cable where it is to be positioned, as shown. Mark the area of the groove.

-
Place the workpiece on the saw
Place the skirting to be machined on the KAPEX table.

-
Adjust the cutting depth limiter
You can use the continuously adjustable cutting depth limiter to set the vertical swivelling range of the saw unit. Doing this makes it easier to groove or flatten out workpieces.
Swivel the cutting depth limiter lever downwards until it locks and guide the saw unit down, as when cutting workpieces to size. The machine should remain switched off.
-
Adjust the depth to be notched 1/2
You can only adjust the relevant groove depth for the workpiece by turning the lever to the left or to the right. The saw unit is moved downwards during the entire process.

-
Adjust the depth to be notched 2/2
To work with precision, you can mark the exact depth on a test piece of skirting or in the end portion of the skirting beforehand and turn the lever until you have set the required depth.


Procedure
-
Switch on the dual-line laser
The dual-line laser helps you to aim for the cutting area with precision.
-
Notching the groove
Move the skirting into position and use the laser to direct the machine towards your mark. Open the clamp for the traction device to achieve the full cutting width. Start on one side of the mark. Then switch on the KAPEX and make the cut. You should then offset the workpiece by the cutting width and continue to make the cuts. Repeat this process as needed until the marked area has been completely notched.

-
Finished notch

-
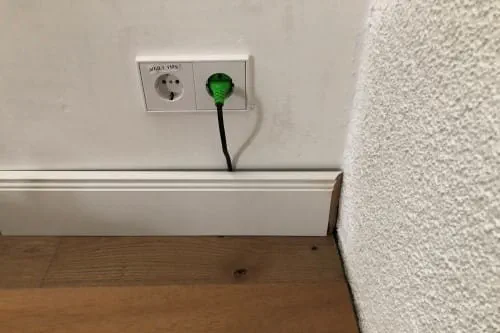
Attach the skirting
Lay the skirting against the wall, carefully position the cable against the notch and pull it into the required position from behind the skirting. In the same process, you can pull the cable out at the other end. This means that you won't have any visible wires unnecessarily in the way any more.


-
Our illustrated guides and work results are documented working steps that we have performed in practice. They are individual examples and do not guarantee or promise that users will obtain the same results. The results will depend on the user's experience and skill, as well as the material being used. Illustrated guides do not replace any Festool operating manuals and/or safety instructions. Liability for ensuring that the information, instructions and applications are free from content defects and defects of title, in particular with regard to the absence of defects, correctness, freedom from third party intellectual property rights and copyrights, completeness and fitness for purpose, is excluded. Claims for damages made by the user, regardless of their legal basis, are excluded. These liability exclusions are not applicable if the damage was intentional or caused by gross negligence, or in cases of statutory liability.
We cannot accept liability for damage resulting from defects.↑
